The Cubit Hire and Rental software system is the most comprehensive Hire and Rental software system available on the market in the world. The system manages all aspects of Hire and Rental and there are special local executable modules that run decentralised on multi points in a company.
We guarantee you the most comprehensive hire, rental, accounting and payroll software ever, for more information or to arrange a demonstration on Cubit please email us on
Please send me more information on Cubit Hire and Rental Software please
1. Adding Hire Equipment
Process – Before you can process a hire you need to add hire equipment to the system and set up the hire prices.
Navigation – Accounting>Asset Ledger>Add Asset
Function – Create a master file for Hire Equipment.
– Maintain equipment settings and other data related to the equipment.
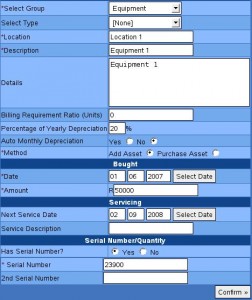
Detailed – A form with the following fields to be completed will be displayed on the screen:
Select Group: This is the Asset Group you want to link the equipment to. You will select the group from the drop down field.
Select Type: This is the Asset Type you want to link the equipment to. You will select the type from the drop down field.
Location: This is the physical location of where the equipment is kept.
Description: This is the name of the equipment.
Details: Any additional information on the equipment.
Percentage of Yearly Depreciation: This is the percentage you will depreciate your equipment by.
Auto Monthly Depreciation: Depreciation will be processed monthly.
Method: There are two options; Add Asset which you select when you want to add the equipment to the system or Purchase Asset which you select when you want to record the actual purchase of the equipment.
Bought: Consists of two fields; Date which is the date on which the equipment was purchased and Amount which is the cost of the equipment excluding VAT.
Servicing: Consists of two fields; Date which is the date on which the equipment should be serviced and Service Description which is the details of the service.
Serial Number/Quantity: Consists of; Has Serial Number: if you select Yes a field to enter the serial number will be displayed. It is compulsory to add at least one serial number to the field labelled Serial Number. Another serial number can be added to the field labelled 2nd Serial Number. If you select No a field to enter the quantity of items will be displayed. Fill in the number of equipment you are adding to the system in the field labelled Quantity and click Confirm.
The details of the added equipment will be displayed on the screen. You will be required to select the contra account for the equipment you are adding from the field labelled Contra Account.
You can add an Image for the equipment. To do this enter the name of the image in the field labelled Image Name and then click on Browse from the field labelled Image Location. Select the file with the picture you want to add and click Open.
Check if all the equipment details are correct and click Write.
2. Setting Up Default Hire Rates/Prices
Process – You can only set up your default hire prices after you have added Hire Equipment into the system.
Navigation – Business>Hire>Hire Settings>Default Hire Basis
Function – Set up default Hire rates/prices.
Detailed – On the first window enter the equipment you want to set up in the field labelled Search and click Search or you can leave the field blank and click Search to get a list of all the Equipment that has been added to the system.
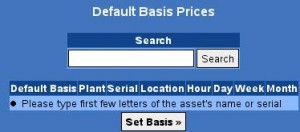
A list of the equipment will be displayed on the screen with the following input fields:
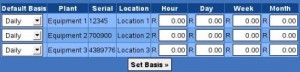
Default Basis: You will select the time period you want to set as the default basis from the drop down menu.
Hour: You will enter the hourly rate you charge to hire out the equipment.
Day: You will enter the daily rate you charge to hire out the equipment.
Week: You will enter the weekly rate you charge to hire out the equipment.
Month: You will enter the monthly rate you charge to hire out the equipment.
When you have completed the fields click Set Basis.
3. Setting Up Half Day Rate
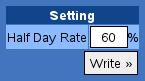
Process – You will use this option to set up the amount you will charge on equipment that is hired out for half a day. This will be based on the amount you charge for a full day hire.
Navigation – Business>Hire>Hire Settings>Half Day Rate
Function – Set up price charged for half day hire.
Detailed – Enter a percentage of the Full Day Rate you will charge on every equipment that is hired out for half a day and click Write.
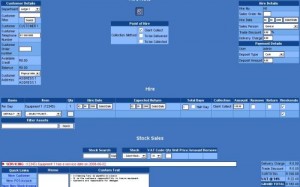
4. Hiring Out Equipment
Process – You will use this option to hire out equipment only. This is not the invoicing process.
Navigation – Business>Hire>New Hire
Function – Keeps a record of all hired out items.
Detailed – On the main hire page fill in the first letters of the customer you want to process a hire for in the field labelled Customer filter and click Search. All the customer fields will be filled automatically. The Customer Order Number is optional but is useful when searching for a customer order. The customer supplies this value from their books.
Select the method that will be used by the customer to collect the equipment from the field labelled Collection Method. The option are:
Client Collect: The client will collect the equipment from your premises.
To be Delivered: You will deliver the equipment to the customer’s premises.
To be Collected: You will collect the equipment from the customer’s premises when they have completed using it.
To add an equipment for the hire enter the first letters of the equipment in the field labelled Filter Assets and click Search. Select the Basis you are going to use to charge for the Hire from the field labelled Basis. Next select the Equipment you want to hire out from the field labelled Item and click Update. The Hire Date, Expected Return, Total Days, Collection, Amount fields will be filled in automatically.
To add another item click Search from the field labelled Filter Assets then select the equipment you want to hire out from the drop down field labelled Item and click Update.
A selected equipment can be removed by clicking in the Remove check box to the right of the equipment. Clicking Update will remove the item from the list.
At the bottom left of the screen is a Comments box. You can add a text that you need displayed on the Hire Note here.
When you have entered all the details for the Hire Note click Update and then Process.
A printable Hire Note displaying the details of the hire will be displayed on the screen with the following fields to be completed by the customer and company representative:
Full Names: This is the full name for the customer representative that is collecting the equipment.
Identity Number: This is the customer representative’s identity number.
Signature-Customer: This is the customer representative’s signature.
Signature-Company Name: Your representative’s signature.
5. Invoicing a Hire
Process – You will use this option to invoice a customer for the equipment they have hired. An invoice is processed when the equipment is returned.
Navigation – Business>Hire>View Hire
Function – Update customer balances.
– Update Hire Sales figure.
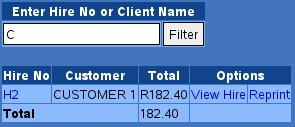
Detailed – On the first window you will enter the name of the customer or the hire you want to invoice in the field labelled Enter Hire No or Client Name and click Filter. For all the hires to display leave the Enter Hire No or Client Name field blank and click Filter. Next to each hire are the options:
View Hire: Details of the hire will be displayed on the screen. You are able to edit the details and reprint a new Hire Note for the hire.
Reprint: This will allow you to make another print out of the Hire Note.
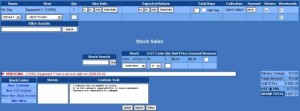
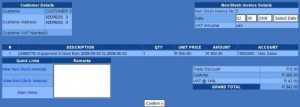
To process the invoice select the View Hire option. Details of the hire will display on the screen.
To return an item click in the checkbox in the field headed Return. You can add stock items to the same invoice by filling in the first letters of the stock item in the field labelled Search Stock and click Search. Select the stock item you want to add to the invoice from the drop down labelled Stock, select the VAT code for the stock item and enter the quantity in the field labelled Quantity and click Update. The stock amount will be added to the total amount of the Hire. Check if all the details are correct and click Return.
The next window will display the details that will appear on the invoice. To record a payment on the invoice fill in the amount in the options that appear under the section headed Payment Details. There are three options:
Amount Paid Cash: You will enter a cash amount received in this field.
Amount Paid Cheque: You will enter a cheque amount received in this field.
Amount Paid Credit Card: You will enter an amount paid by credit card.
After you have completed the fields click Write.
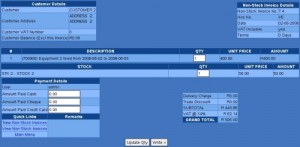
A printable copy of the invoice will display on the screen ready to be printed.
6. Viewing Hire Invoices
Process – You will be able to make reprints and credit notes by viewing the hire invoices.
Navigation – Business>Hire> View Hire
Function – Saves a record of all invoiced hires.
Detailed – Select the date range for the Hire Invoices you want to view. Enter the hire number or the customer name you want to view the invoice for in the field labelled Enter Hire No or Customer Name or you can leave the field blank to get a list of all the invoices within the selected date range. Click Search. A list of the invoices will be displayed with the following options next to them:
Reprint: You will be able to make another copy of the processed invoice.
Credit Note: You can create a credit note on a selected invoice from here.
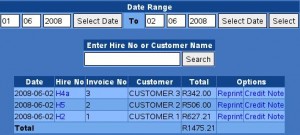
If you have selected to process a credit note on a particular invoice a window with the credit note details will be displayed. Check if all the details are correct and click Confirm and then Write.
7. Booking Equipment
Process – This will enable you to set aside equipment for a customer.
Navigation – Business >Hire>Bookings> New Bookings
Function – Maintain a record of all equipment that has been booked by customers.
Detailed – Select the equipment you want to book for a customer from the drop down field labelled Small Plant. Select the Customer you want to book the equipment for from the drop down field labelled Customer. Next select the period the customer wants to book the equipment for from the field labelled Booking Date and click Confirm.
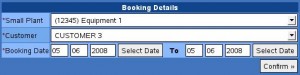
The details of the booking will display on the next window. Check if all the details are correct and click Write.
When you view your bookings (Business>Hire>Bookings>View Bookings) the following options will be available:
Edit Booking: You can change the details of the booking.
Remove Booking: Deletes the booking from system.
Hire: Converts the booking into a Hire.
![]()
REPORTS
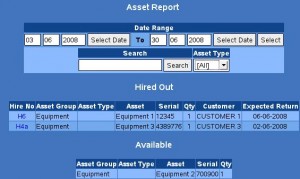
1. Asset Report
Process – This report will show the equipment that has been hired out and the available equipment.
Navigation – Business>Hire>Hire Reports>Asset Report
Function – Maintains a record of hired out and available equipment.
Detailed – Select the date range for which you want to view the report and click Select. Fill in the name of the equipment you want to view the report on in the field labelled Search or alternatively you can leave the field blank to view the report on all the equipment and click Search. The equipment will be displayed in two sections:
Hired Out: This will display information on equipment that has been hired out.
Available: This will display equipment that is available for hiring.
Hire Invoice Report
Process – This report will display hire invoices that have been processed.
Navigation – Business>Hire>Hire Reports>Hire Invoice Report
Function – Maintains a record of hire invoices that have been processed.
Detailed – Select the date range for the invoices you want to view the report for. There are three options on how you can view the report:
All: This will display all the hire invoices that have been processed during the selected date range.
Paid: This will display all the hire invoices that have been paid for.
Unpaid: This will display all the hire invoices that have not been paid for.
After you select the option on how you want to view the report click Display.
The following fields will be displayed on the report:
Invoice Num: This is the number allocated to the invoice.
Invoice Date: This is the date on which the invoice was processed.
Customer: This is the customer that was invoiced.
Invoice Total: This is the total amount of the invoice.
Outstanding: This is the amount that has not been paid on the invoice.
Amount Paid: This is the amount that has been paid on the invoice.
Paid/Unpaid: Indicates whether or not an invoice has been paid.

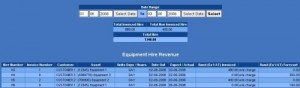
3. Hire Detail Report
Process – This report will display all hires that have been processed with information on whether or not a hire has been invoiced.
Navigation – Business>Hire>Hire Reports>Hire Detail Report
Function – Maintains a record of all hires that have been invoiced and those that have not been invoiced.
Detailed – Select the date range for which you want to view the report on and click Select. Just below the date are three sections:
Total Invoiced Hire: This is the total amount for hires that have been invoiced.
Total Non Invoiced Hire: This is the total amount for hires that have not been invoiced.
Total Hire: This is the total amount for hires that have been invoiced and those that have not been invoiced.
The following fields will be displayed on the report:
Hire Number: This is the number allocated to the hire.
Invoice Number: This is the number allocated to the hire invoice.
Customer: This is the customer that you have processed a hire for.
Asset: This is the equipment that was hired out.
Units Days/ Hours: This is the time basis used for the hire.
Date Out: This is the date on which the equipment was hired out.
Expect/Actual: This is the date on which the equipment is back from the hire.
Rand (Ex VAT) Invoiced: This is the invoiced amount on the hire excluding VAT.
Rand (Ex VAT) Forecast: This is the amount that is yet to be invoiced on hired equipment.
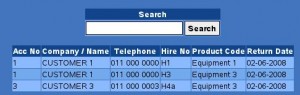
4. Overdue Hires
Process – This report will display equipment that is due for returning.
Navigation – Business>Hire>Hire Reports>Overdue Hires Report
Function – Maintains a record of equipment that is due for returning.
Detailed – A list of the overdue hires will be displayed. To filter you can enter the name of the customer you want to view the report on in the field labelled Search. The following fields will be displayed:
Acc No: This is the customer’s account number.
Company/Name: This is the name you use to refer to the customer.
Telephone: Customer’s contact number.
Hire No: Number allocated to the hire.
Product Code: The equipment hired out.
Return Date: This is the date on which the equipment should be returned.
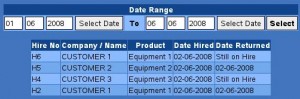
5. Hire History Report
Process – This report will display information on hired equipment.
Navigation – Business> Hire>Hire Reports>Hire History Report
Function – Maintains a record of the dates on which equipment is hired out and if it has been returned or still hired out.
Detailed – Select the date range you want to view the report on and click Select. The following fields will be displayed:
Hire No: Number allocated to the hire.
Company/Name: This is the name you use to refer to the customer.
Product: This is the equipment hired out.
Date Hired: This is the date on which the equipment was hired out.
Date Returned: This is the date on which the hired equipment was returned.
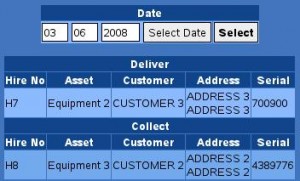
6. Collect and Deliver Report
Process – This report will display the equipment that needs to be collected from customers and delivered to customers.
Navigation – Business>Hire>Hire Reports> Collect and Deliver Report
Function – Maintains a record of all the equipment that should be collected from a customer or delivered to a customer.
Detailed – Select the date on which you want to view the report on and click Select. The report will be displayed in two sections:
Deliver: Equipment that needs to be delivered to a customer will be displayed here.
Collect: Equipment that needs to be collected from the customer’s location.
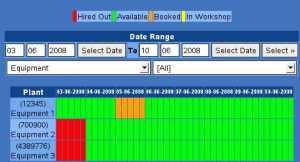
7. Availability Report
Process – This report will display the status of equipment over the selected period.
Navigation – Business>Hire>Hire Reports>Availability Report
Function – Maintains a record of the availability of equipment.
Detailed – This report uses a different colour to display the status of equipment. Select the date range you want to view the report on and click Select. Select the equipment group you want to view from the drop down menu on the left below the Date Range field. Next select All from the drop down menu on the right below the Date Range field.
Each equipment will be displayed with a different colour for each status. The different colours in the report are:
Red: This means that the equipment is hired out.
Green: This means that the equipment is available.
Orange: This means that the equipment has been booked for a hire.
Yellow: This means that the equipment is in the workshop.
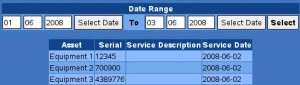
8. Service Report
Process – This report will display the service details of equipment.
Navigation – Business>Hire>Hire Reports>Service Report
Function – Maintains a record of the equipment that has been serviced.
– Maintains a record of the date on which equipment was booked out for a service.
Detailed – Select the date range you want to view the report for and click Select. The following fields will be displayed:
Asset: This is the equipment that has been serviced.
Serial: This is the equipment’s serial number.
Service Description: These are details of the service.
Service Date: This is the date on which the equipment was serviced.
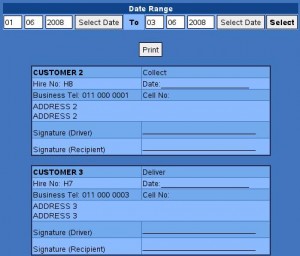
9. Driver Collect/Deliver
Process – You will use this option to print forms that will be used by the driver when he is collecting or delivering equipment to customers.
Navigation – Business>Hire>Hire Reports>Driver Collect/Deliver
Function – Saves printable forms to confirm the drivers collections and deliveries of equipment from a customer’s location.
Detailed – Select the date range for which you want to generate forms for and click Select. The forms will show the Customer’s Name, Hire Number, Contact Number for the customer, Address and whether the equipment should be collected or delivered.
The following input fields will be displayed on the form:
Date: This is the date on which the equipment is collected or delivered.
Cell Number: This is the contact number for the person the driver will deliver the equipment to or collect the equipment from.
Signature (Driver): This is your driver’s signature.
Signature (Recipient): This is the person that will receive the equipment if the driver is delivering or giving out the equipment if the driver is collecting.
You can print a copy of the form by clicking Print.
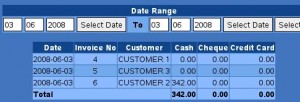
10. Hire Cash Report
Process – The report will display hire invoices that have been processed and the amount paid in cash next to each invoice.
Navigation – Business>Hire>Hire Reports>Hire Cash Report
Function – Maintains a record of cash payments made on a hire invoice.
Detailed – A report with the following fields will be displayed:
Hire No: This is the number used to refer to the hire.
Invoice No: This is the number used to refer to the hire invoice.
Customer: This is the customer that hired out the equipment.
Discount: This is the discount amount given to a customer.
Total: This is the total amount of the invoice.
Paid Cash: This is the total cash amount paid on the invoice.

11. Daily Hire Cash Up Report
Process – This report will display the total payments that have been received from hire invoices.
Navigation – Business>Hire>Hire Reports>Daily Hire Cash Up Report
Function – Maintains a record of payments that have been processed on hire invoices.
Detailed – Select the date range for which you want to view the report on and click Select. A report with the following fields will be displayed:
Date: This is the date the hire invoice was processed on.
Invoice No: This is the number used to refer to the hire invoice.
Customer: This is the customer that was invoiced for the hire.
Cash: The cash amount paid on a hire invoice will be displayed in this field.
Cheque: The cheque amount paid on a hire invoice will be displayed in this field.
Credit Card: The credit card amount paid on a hire invoice will be displayed in this field.
For more information or to arrange a demonstration on Cubit please email us on
Please send me more information on Cubit please