Manufacturing Software:
The Cubit Manufacturing software consists of three different suites of software, the first suite is described in more detail below and with screen shots. We also have manufacturing modules that does automatic calculations of size, width and dimension for linear manufacturing and re-manufacturing.
For more information or to arrange a demonstration please email us on
Please send me more information on manufacturing software please
Manufacturing requirements are also sometimes unique and we can customise the system to your exact requirements so please call us today for a no obligation demonstration.
Herewith an introduction to one of the manufacturing suites:
Before you can start Manufacturing a product you need to add the following onto the system:
Machinery
Operators
Labour Costs
1.Adding Machinery
Process – This is the machinery that will be used during the manufacturing process. You will need to add Machine Groups before you can add the individual machines (Manufacturing > Machines > New Machine Group)
Navigation – Manufacturing > Machines > New Machine
Function – Maintains machine settings.
Detailed – Complete the add new machine screen and click Confirm. Check if all the details are correct and click Write.
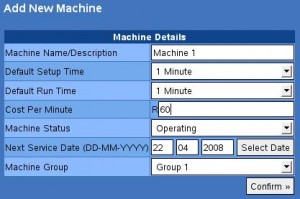
The following are descriptions of the non standard fields:
Default Setup Time: This is the time it will take you to set up the machine before the manufacturing process begins.
Default Run Time: This is the time the machine is left running during the manufacturing process.
Cost Per Minute: This is the cost incurred by the machine during the manufacturing process.
Machine Status: The state in which the machine is in at the time you are adding it to the system.
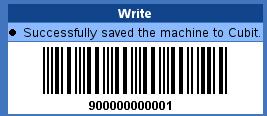
After adding the machine a Barcode that has been allocated to the machine will be displayed on your screen.
2. Adding Operators
Process – These are the people who will use the system during the manufacturing process.
Navigation – Manufacturing > Operators
Function – Maintains Operator settings
Detailed – You will be required to add:
Stock User: This is the person that will allocate stock/material to a job.
Factory Supervisor: This is the person who will have access to all the processes when an item is manufactured. He/she will approve that a job has been completed successfully.
Machine Operator: This is the person who runs the machines during the manufacture of an item.
Time and Attendance Operator: This is the person who will record the time a factory worker started working and the time he/she stopped working.
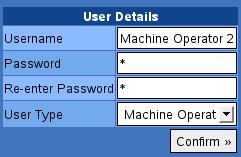
You will be required to complete the following fields:
Username: This is the name the operator will use to log into the system.
Password: This is the password the operator will use to log into the system.
Re-enter Password: You will fill in the password again for confirmation.
User Type: You will select the user type you want to link the operator to from the drop down menu.
Click Continue.
The details of the user will appear on the next screen. Check if all the details are correct and click Write. A barcode will be allocated to each operator.
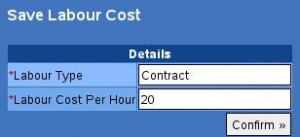
3. Adding Labour Costs
Process – This is the cost of the labour you incur during the manufacturing process. This cost will be included in the final cost of the manufactured product.
Navigation – Manufacturing > Add Labour Cost
Function – Maintains labour cost settings.
Detailed – You will be required to fill in the Labour type and the Labour Cost per Hour. Click Confirm and then Write.
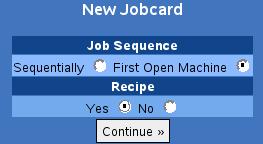
4. Creating a Recipe
Process – This option is used to add and save recipes into the system. To create a recipe you are simply taking the quantity of raw materials used to manufacture a final product, the machines used in the process and the labour costs. You will use the recipes when you want to process a job.
Navigation – Manufacturing>Job Card>New Job Card
Function – Maintains and saves recipes into the system.
Detailed – On the first window you will be required to select the Job sequence for the recipe from the two options Sequentially and First Open Machine. Select Yes from the field headed Recipe since you are creating a recipe. Click Continue.
Next you will be required to fill in the details for the Recipe. The following is a description of the fields:
Description: This is the name of the recipe you are creating. You will use this name when referring to the recipe in future.
Customer: You will select a customer if the recipe is for a specific customer.
Stock: You will select the product you want to manufacture.
Delivery Date: This is the date you expect the product to be manufactured by.
Client Order Number: You will get this value from the client.
Group: Here you will select the Group of the machine that will be used to manufacture the product.
Operation Instructions: You will fill in the instructions of how to operate the machinery.
Std Setup: This is the amount of time it will take the machine to be ready to manufacture.
Std Run: This is the amount of time the machine will usually take to complete the manufacture
of the product.
After you have completed the details click Update

A new field will be displayed at the bottom of your screen. You will be required to select the
stock items and quantities that will be used to manufacture the final product. Click on the Stock Code drop down and select the stock. Fill in the quantity field and click Add Stock.

When you have completed the details of the recipe click Update to save the recipe. A Print option is available to make a print out.
5. Creating a Job Card From a Recipe
Process – This enables you to create a job card from a saved recipe.
Navigation – Manufacturing>Job Cards>View Recipes
Function – Create Job Card. – Saves Job Card details into the system.
Detailed – Fill in the description of the recipe you want to view (use the same description entered when you created the recipe) and click Search or you can leave the search field blank to view all the recipes in the system. A list of the recipes will display on the screen with the following options:
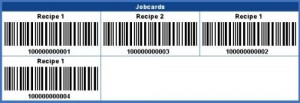
Create Job From This Recipe: This will enable you to create a job card. When clicked on, the details of the recipe will be displayed on the screen with a job number allocated to the job card. You will be able to change the details appearing on the job card to match the job. Check that all the details are accurate and click Update. A Print option is available to make a print out.
Edit: Enables you to change the details of the recipe.
Remove: This will delete the Recipe from the system.
![]()
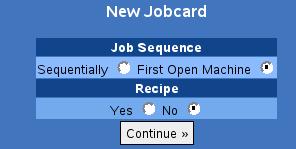
5.Creating a Job Card without a Recipe
Process – This is a document that is used to inform the factory of the items that need to be manufactured.
Navigation – Manufacturing > Job Cards > New Job Card
Function – Records orders that have been placed in the factory.
– Enables you to track which stage the manufacturing process is on.
Detailed – On the first window you will be required to select the Job sequence and whether or not you are creating a recipe. After making the selection click Continue.
Next you will be required to fill in the details for the Job Card. The following is a description of the fields:
Description: This is the name of the product you will manufacture.
Customer: You will select a customer if the job is for a specific customer.
Stock: You will select the product you want to manufacture.
Delivery Date: This is the date you expect the product to be manufactured by.
Client Order Number: You will get this value from the client.
Group: Here you will select the Group of the machine that will be used to manufacture the product.
Operation Instructions: You will fill in the instructions of how to operate the machinery.
Std Setup: This is the amount of time it will take the machine to be ready to manufacture.
Std Run: This is the amount of time the machine will usually take to complete the manufacture of the product.
Special Instructions: You will fill in any other instructions.
Labour Type: You will select the labour type that is used during the manufacture of the product.
Remove: Enables you to remove the machine added to the job card.
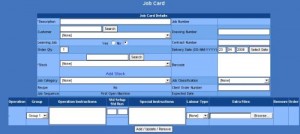
Fill in all the information and click Update.
A new field will be displayed at the bottom of your screen. You will be required to select the
stock items and quantities that will be used to manufacture the final product. Click on the Stock Code drop down and select the stock. Fill in the quantity field and click Add Stock.
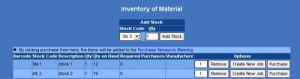
When you have completed selecting the stock click Update and then Print. A form in printable format will display on your screen.
6. Allocating Stock to a Job
Process – This process will move your stock from Store 1 (which is the default store in the system) to the Production Store.
Navigation – Manufacturing > Operators > Stock User
Function – Update stock balances – Maintains a record of the stock items used on a job.
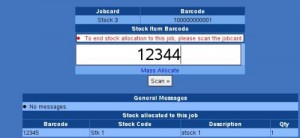
Detailed – On the first page you will be required to scan the Bar code allocated to this job as the job number.
Next you will be required to scan the Bar code allocated to the Stock user carrying out the stock allocation process.
The next screen that appears requires you to scan the bar code for the stock items that are to be used during the manufacturing process. After scanning in the stock items to be used you can scan the bar code allocated to this job to complete the stock allocation.
7. Manufacturing a Product/Stock Item
Process – This is when the raw materials are assembled to manufacture the finished product.
Navigation – Manufacturing > Operators > Machine Operator
Function – Manufacturing the finished product.
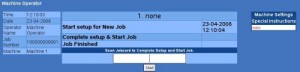
Detailed – On the first page you will be required to scan the bar code allocated to this job as the job number.
Next you will be required to scan the bar code allocated to the Machine Operator and lastly the bar code allocated to the machinery that will be used.
The next screen that appears will require you to scan the bar code allocated to this job as the job number. This will record the time you have completed setting up your machinery and the time your machine starts running.
When the manufacturing process is completed you will be required to scan the bar code allocated to this job as the job number. This will record the time the manufacturing process was completed.
8. Ending a Job
Process – This is where approval is given by the Factory supervisor that a product has been manufactured completely and successfully.
Navigation – Manufacturing > Operators > Factory Supervisor
Function – Transfers the finished product from the Production store to Store 1.
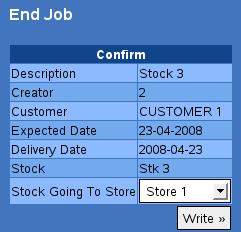
Detailed – The Factory Supervisor’s screen will be displayed on the screen. A list of all the Jobs that have not been approved and ended by the Factory Supervisor will be displayed if the Jobcard drop down is clicked. Select the Job you want to end. The stage of completion of the job will be displayed under Job Status in percentage form.
To end the job click End Job.

The next screen will display information on the Job. You will then select the store to which the manufactured item should be transferred to and click Write.
Manufacturing Reports
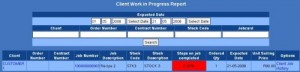
1. Client Work In Progress
Process – This report will display the stage at which a client’s job is currently on.
Navigation – Manufacturing>Reports>Client Work in Progress
Function – Maintains the stage at which a client’s job has been processed up to.
Detailed – A list of all the Client’s jobs will be displayed on the screen. To view work for specific dates select the date range from the field labelled Expected Date. To view Work in Progress for a specific client enter the client’s name in the field labelled Client.
The following fields will be displayed on the report:
Client: This is the customer you are viewing the report for.
Order Number: This is the client’s order number on the job card.
Contract Number: This is the contract number for the job.
Job Number: This is the system generated number that is allocated to the job.
Job Description: Details of the Job.
Stock Code: This is the code for the product to be manufactured.
Stock Description: This is the description for the product to be manufactured.
Steps On Job Completed: The displayed percentage represents the amount of machine that have been completed for the job.
Ordered Qty: This is the number of items the client has ordered.
Expected Date: This is the date on which the client should receive the finished product.
Unit Selling Price: This is the selling price for the finished product.
Options-Client Job History: If clicked, will display previous jobs on the client.
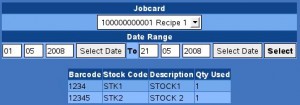
2. Stock Usage Report
Process – The report will show you the amount of stock that has been used for a job.
Navigation – Manufacturing>Reports>Stock Usage Report
Function – Maintains and records the amount of stock used on a job.
Detailed – Select the job card you want to view the report on from the drop down field labelled Jobcard or you can select to view a report on all the jobcards by selecting All from the same drop down field. A report with the following fields will be displayed:
Barcode: This is the barcode for the stock items used in the production process.
Stock Code: This is the code for the stock items used in the production process.
Description: This is the description for the stock items used in the production process.
Qty Used: This is the number of items used for the selected job.
3. Work In Progress Report
Process – This report will display all the stages that have been completed on a job. This report will also display the user that performed the task.
Navigation – Manufacturing>Reports>Work In Progress Report
Function – Maintains a record of the tasks that have been performed on a job.
– Maintains a record that shows which user performed a task.
Detailed – Select the job you want to view the report on from the drop down field labelled Jobcard. Select the machine group you want to view the report on from the drop down field labelled Machine Group. Select the user you want to view the report on from the drop down field labelled Operator. Alternatively you can click in the check box labelled Display Jobs Currently in Progress to view all the tasks that have been performed on all the incomplete jobs.
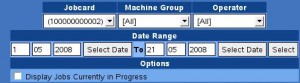
The report will be displayed with the following fields:
Job Number: This is the system generated number that is allocated to the job.
Job Description: Details of the job.
Job Card Operation: Instructions for machine operation.
Contract Number: This is the contract number for the job.
Drawing Number: This is the drawing number for the job.
Operator: This is the user that performed the task.
Event: The job carried out.
Performed on: The item that an Event has been performed on.
Time: Time and Date of when the task was performed.
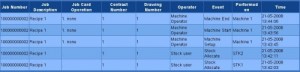
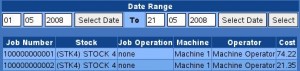
4. Work Completed Report
Process – This report will display all the jobs that have been confirmed complete by the Factory Supervisor.
Navigation – Manufacturing>Reports>Work Completed Report
Function – Maintains a record of completed jobs.
Detailed – Select the job card you want to view the report on from the drop down field labelled Jobcard or select All to view a report on the jobs that have been completed.

A report displaying the following fields will be displayed on the screen:
Job Number: This is a system generated number that is allocated to the job.
Job Description: Details of the job.
Job Card Operation: These are instructions on machine operation.
Event: Task carried out.
Operator: The user that performed the task.
Machine: This is the machine involved in the manufacturing process.
Time: This is the time and date of when the task was performed.
![]()
5. Trial Kitting
Process – You will use this option to estimate the costs you will incur when you manufacture a product.
Navigation – Manufacturing>Reports>Trial Kitting
Function – Calculate estimated cost to manufacture a product.
Detailed – Enter the stock code or description for the Stock item you want to estimate the costs on from the field labelled Filter and click What if. Select a recipe from the drop down field labelled Recipe. Enter the quantity of products you want to calculate the cost on in the input field labelled Qty.

The estimated machine costs will be displayed under the field labelled Estimated Machine Costs and the estimated stock costs will be displayed under the field labelled Estimated Stock Costs. You can change the quantities you want to estimate the costs on and click Recalculate. Updated figures will appear in the Estimated Cost field.
6. Job Cost History
Process – This report will enable you to view the machine costs incurred on completed jobs.
Navigation – Manufacturing>Reports>Job Cost History
Function – Maintains a record of the machine costs incurred on a job.
Detailed – A report with the following fields will be displayed:
Job Number: System generated number allocated to the job.
Stock: This is the manufactured stock item.
Job Operation: Instructions on how to operate the machine.
Machine: This is the machine that was used during the manufacturing process.
Operator: This is the user that performed the task.
Cost: This is the cost incurred by the machine during the production process.
7. Quality Control
Process – You need to Add Reasons (as to why a product has not been confirmed finished) to the system before you can use the Quality Control option. To add a reason click Manufacturing>Quality Control>Quality Control Reasons.
Navigation – Manufacturing>Quality Control>Quality Control
Function – Maintains a record for jobs that have not been properly done.
Detailed – Jobs that have not been ended by the factory supervisor will be displayed on the screen with the following fields:
Jobcard Barcode: This is a system generated number allocated to the job.
Jobcard Description: Details of the job.
Jobcard Item: These are the machine operation instructions.
Machine: This is the machine used during the manufacturing process.
Machine Group: This is the group the machine is allocated to.
Time Completed: This is the time and the date the machine operations were completed.
Cost: Cost incurred by the machine operations.
Cost per Item: This is the machine cost incurred per item that is manufactured.
Qty: This is the input field you will use to record the number of items that have not passed the Quality (items that have not been manufactured to the correct standard).
Reason: You will select the reason why the item has not passed quality control.
After you have completed the fields click Save.
![]()
8. Messaging
Process – This option will allow you to send messages to other operators using the system.
Navigation – Manufacturing>Messaging>Add General Message
Function – Send messages to other operators.
Detailed – Type in the message you want to send in the input field labelled Message. The operators in the system will be displayed on the right side under the field labelled Operators. Next to each type of operators is a check box. Tick in the check box next to the Operators you want to send the message to and click Confirm.
![]()
The details of the message will be displayed on the next window. Check if all the details are correct and click Write.
9. Barcodes
Process – This option will enable you to view all the barcodes that have been allocated in the system and print them.
Navigation – Manufacturing>View Barcodes
Function – Maintains a record of all Barcodes that have been generated in the system.
Detailed – All the barcodes in the system will display on the screen. To filter on the barcodes you want to view select the type from the drop down field labelled Filter and click Search. All the barcodes in the selected type will be displayed. To view the barcode for a specific item fill in the description of the item in the input field labelled Filter. Select the type from the drop down field labelled Filter and click Search.