Property Software:
The Cubit property software and payroll is the most comprehensive property system on the market today. The system is easy to use, can perform all functions that is required in the management of all different types of properties and does rentals, sales, sectional title, share block, boomed complexes, building management, building rentals, managing agent, managing agents, real estate agent and real estate agency management and everything else related to property management.
We guarantee you the most comprehensive property management, accounting and payroll software ever, for more information or to arrange a demonstration on Cubit please email us on
Please send me more information on Cubit Property Software please
Herewith some of the basics of the property software:
Please note that before you can add a Property to the system you need to add Listing Agents. This is done by adding the Listing Agent as an Employee (Property>Agents>Add New Employee/Agents). On the Add Employee screen is the field labelled Commission Agent. You have to select the Yes option for the system to acknowledge that a Listing Agent has been added.
![]()
RENTAL PROPERTY
1. Adding a Rental Unit
Process – You will use this option to add Rental Units that will be managed by you into the system.
Navigation – Property>Rental Units>Add New Rental Property
Function – Creates a rental property master file.
– Maintains property settings and other data related to the property.
– Default rental price is set in the same master file.
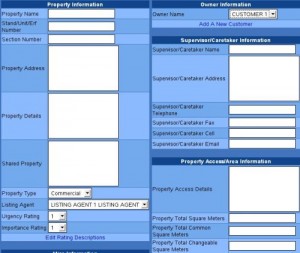
Detailed – The Add New Rental Property screen will be displayed with the following fields to be completed:
Property Name: This is the name you will use to refer to the property.
Stand/Unit/Erf Number: This is the number used to refer to the property.
Section Number: You will fill this in if there is more than one number used to refer to the property.
Property Address: This is the physical location of the property.
Property Details: This is information/brief description about the property.
Shared Property: Enter details if the property is shared.
Property Type: You will select the property type from the drop down menu in this field.
Listing Agent: You will select the employee listing the property.
Owner Name: You will have to add the owner as a customer in the Debtors>Add Customer menu so that the name appears in the drop down field labelled Owner Name. Select the name of the owner you want to link this property to.
Supervisor/Caretaker Information: The various fields under this heading require general information of the person that looks after the property.
Property Access/Area Information: The fields under this heading require information of how accessible the property is and the size of the property.
Rands Rental Per Month: This is the monthly rental to be charged on the property.
Notes about this property: Additional information on the property.
Available From: This is the date on which the property is available for rental.
Outstanding Tasks: This is any jobs that have not been completed on the property.
After you complete the form click Add Property.
2. Adding a Complex/Building
Process – You will use this option to add a Complex/Building with units that want to be rented out.
Navigation – Property> Rental Units>Add New Complex/Building
Function – Maintains property settings and other data related to the property.
– Default rental price is set.
Detailed – The following fields will be displayed on the screen:
Owner/Agent Agreement Type: You will select the agreement type from the drop down menus.
Property Name: This is the name that is used to refer to the property.
Stand/Unit/Erf Number: This is the number used to refer to the property.
Property Address: This is the physical location of the property.
Property Details: This is a brief description of the property.
Shared Property: Enter details if the property is shared.
Number of Units in the Building: This is the number of individual units in the property.
Property Type: You will select the property type from the drop down menu.
Listing Agent: This is the agent that is dealing with the property.
Owner Information: This section requires you to enter general details for the owner in the fields that are displayed.
Property Access/Area Information: This section requires you to enter details on how accessible the property is and the size of the property in square metres.
Supervisor/Caretaker Information: This section requires you to enter general details for the supervisor/caretaker in the fields that are displayed.
On completion click Add Property. Check if all the details are correct and click Confirm.
A window with the number of units you want to add into the system will appear on the screen. The following fields will require information:
Unit number: This is the number used to refer to the unit.
Rands Rental Per Month: This is the monthly rental charged on the unit.
Total Square meters: This is the size of the property in square metres.
Notes about this unit: You will enter a brief description about the unit.
Available From: This is the date on which a tenant can occupy the unit.
Outstanding Tasks: You will enter incomplete jobs on the unit.
On completion click Confirm.

3. Adding a Tenant
Process – You need to link a property to a tenant so that you are able to process rentals in the system.
Navigation – Property>Rental Units>Add New Tenant
Function – Maintain and record tenant settings.
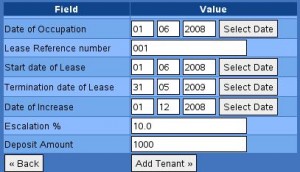
Detailed – A form requiring general details of the tenant will be displayed. Fill in the required information and click Add Tenant. The next window will require you to fill in a form concerning the lease. The following fields will be displayed:
Date of Occupation: This is the date the tenant will move into the rental property.
Lease Reference number: This is a number you will use when you want to refer back to the lease in future.
Start date of Lease: This is the date on which the tenant moves into the property.
Termination date of Lease: This is the date on which the lease expires.
Date of Increase: This is the date on which the property’s rental charge will be increased.
Escalation: This is the percentage the rental will be increased by.
Deposit Amount: This is an extra amount that is paid by the tenant prior to moving in. This amount is payable back to the tenant when they leave the property.
After you have completed the form click Add Tenant.
The next window will display the details of the tenant. Check that all the details are correct and click Confirm.
4. Billing Rent to a Tenant
Process – This option allows you to bill both; a tenant that is renting a property that is not charged VAT (in this case the owner of the property is not VAT registered) and a property that is charged VAT(in this case the owner of the property is VAT registered).
Navigation – Property>Rental Units>Receive Rent/Bill Rent
Function – Maintain a record of billed tenants.
– Update tenant balances.
Detailed – On the first window select the tenant you want to bill from the drop down field labelled Tenant or alternatively enter the name of the tenant in the input field labelled Filter: Tenant Surname. If you have used the Filter: Tenant Surname field click Filter and if you have used the Tenant field click Next. The next window will display the details of the Tenant you have selected to bill with the options:
Print Tenant: This will enable you to print a form with all the transactions that have been processed on the tenant’s account.
Email Print Out to Tenant: This will enable you to send the Print Out via email if your system has been configured to do so.
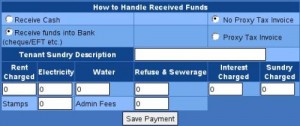
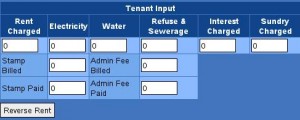
Process Tenant Input/Listing: You will use this option to process the tenant’s rental bill. When clicked the following fields will display on the screen:
Receive Cash: You will use this option to record a Tenant’s payment in cash.
Receive funds into Bank: You will use this option to record a Tenant’s payment that has been processed through the bank.
No Proxy Tax Invoice: You will use this option to bill a tenant that is renting a property that is not charged VAT.
Proxy Tax Invoice: You will use this option to bill a tenant that is renting a property that is charged VAT.
Tenant Sundry Description: You will fill in the details of the amount entered in the field labelled Sundry Charged.
Rent Charged: This is the rental amount charged on the property.
Electricity: This the electricity usage amount charged on the property.
Water: This the water usage amount charged on the property.
Refuse & Sewerage: This is the refuse collection and sewerage charged on the property.
Interest Charge: This is the interest charged on any outstanding payment.
Stamps: This is the stamps charged on the property.
Admin Fees: This is the administration fee charged to the tenant for the property.
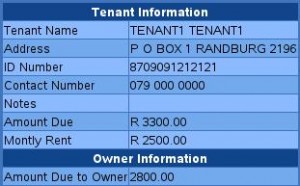
When you select to bill a tenant using the No Proxy Tax Invoice option you will fill in the fields you want to bill the tenant for and click Save Payment. The screen will display the amount due from the tenant in the field labelled Amount Due and the amount owed to the property will be displayed in the field labelled Amount Due to Owner.
A tax invoice will be produced for the Admin Fees only as it is the only item that VAT will be charged on. You will print out the invoice from the Debtors > View Customers>Print Invoices.
When you select to bill the tenant using the Proxy Tax Invoice option you will fill in the fields you want to bill the tenant for and click Save payment. A printable tax invoice will display on the screen with items you have billed the tenant for.
5. Billing a Property Owner
Process – This option will enable you to create an invoice to the property owner for items like Collection Fees, Water and Electricity paid on behalf of the owner.
Navigation – Property>Rental Units>Receive Rent/Bill Rent
Function – Maintain a record of billed property owner.
– Update owner balances.
Detailed – On the first window select the tenant that is renting the property that belongs to the owner you want to bill from the drop down field labelled Tenant. The next window will display the details of the tenant. You will process the owner from this same screen but using the owner options displayed on the screen. Options available are:
Print Owner: This will display a printable form of all the transactions that have been processed on the Owner’s account.
Email Print Out to Owner: This will enable you to send the print out via email if your system has been configured to do so.
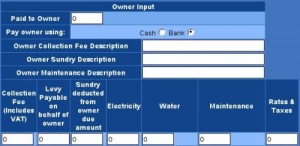
Process Owner Input/Listing: You will use this option to bill the owner. When you select this option the following fields will be displayed on the screen:
Paid to Owner: This is the amount you want to pay to property owner.
Pay owner using: If using cash click in the field labelled Cash and if using the bank click in the field labelled Bank to record payments to a property owner.
Owner Collection Fee Description: You will enter the details of the Collection Fee if you have billed the owner with the amount.
Owner Sundry Description: You will enter the details of the Sundry charged if you have billed the owner with the amount.
Owner Maintenance Description: You will enter the details of the Maintenance charged if you have billed the owner with the amount.
Collection Fee: This is the amount you bill the owner for the rental collection services you are providing for him.
Levy Payable on behalf of Owner: This is the Levy amount that you have paid for the property and now you want to claim it from the owner.
Sundry Deducted from Owner Due Amount: This is the amount paid for sundry on behalf of the owner.
Electricity: This is the amount paid for electricity on behalf of the owner.
Water: This is the amount paid for water on behalf of the owner.
Maintenance: The amount entered here is for any maintenance done to the owner’s property.
Rates and Taxes: This is any rates and taxes billed to the owner.
After you have completed the fields with the amounts owed by the owner click Save Payment.
A tax invoice will be produced for the Collection Fee only as it is the only item that VAT will be charged on. You will print out the invoice from the Debtors>View Customer>Print Invoices.
6. Reversing a Rental (No Proxy Tax Invoice)
Processed – You will use this option to reverse a rental that has been processed using the No Proxy Tax Invoice option.
Navigation – Property>Rental Units>Payment/Bill Reversal
Function – Maintains a record of all rentals that have been reversed.
Detailed – Select the tenant you want to reverse the rental for from the drop down menu labelled Tenant and click Next. A screen with the same fields that appear on the Bill Rent screen will be displayed. Fill in the same fields with the same amounts you entered when you processed the rent and click Reverse Rent.
7. Reversing a Rental (Proxy Tax Invoice)
Process – You will use this option to reverse a rental that has been processed using the Proxy Tax Invoice option.
Navigation – Property>Rental Units>Property Credit Note
Function – Maintains a record of all the credit notes that have been issued for the purpose of reversing a rental.
Detailed – You will be required to complete the following fields:
Tax Credit Note To: You will select the tenant you want to reverse a rental on.
Date: The date on which you want to process the transaction.
Reference Number: This is a system generated journal number you will use to refer to the transaction.
Amount: You will enter the amount you want to reverse then select if the Amount Includes VAT, or Excludes VAT, or Has No VAT.
Contra Account Customer: This is the owner of the property you want to reverse the rental for.
When you have completed all the required details click Next.
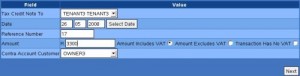
You will be required to enter the details of the transaction in the field labelled Transaction Details and click Confirm. Check if all the details are correct and click Write.
8. Processing Month End Statements
Process – You will use this option to process monthly statements for both Tenants and Property Owners.
Navigation – Debtors>Debtors Statement PDF
Function – Tenant and Owner bulk statement printing.
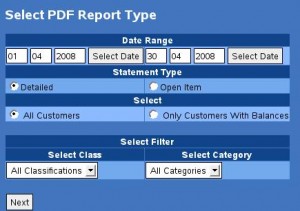
Detailed – These are the steps to running your monthly statements:
Select the date range you want to print the statements for.
Select the Statement type. There are 2 types of statements; Detailed – displays all transactions on the tenant/owner’s account and there is Open Item – displays outstanding invoices only that is invoices that have not been paid yet.
Select if you want to process statements for All Customers or Only Customers With Balances.
You can filter your customers further by selecting a Classification and Category you want to process the statements for and click next.
9. Processing a Statement for a specific Tenant/Owner
Process – You will use this option when you want to process a statement for certain tenants/owners.
Navigation – Property>Rental Units>Reports>Process Statements
Function – Process statements for only selected Tenant/Owner.
Detailed – All the Tenants and Owners will be displayed on the screen. Select the tenant/owner you want to process the statement for by clicking in the check box next to the name and click Select.
![]()
You will recognise the statements you have processed because the check box remains ticked. If you want the names of the processed statements to be removed from the displayed screen click Update. To have the names displayed on the screen again click Reset All Values.
10. Collection Commission Report
Process – This report will display the Collection fees charged on each property.
Navigation – Property>Rental Units>Collection Commission Report
Function – Maintains a record of the collection fees charged.
Detailed – Select the date range you want to view the report on and click Next. A list of all the property charged collection fees will be displayed on the screen.
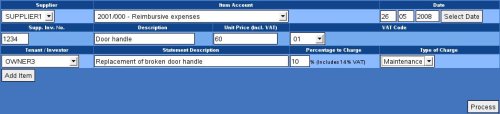
11. Batch Creditor Non Stock Invoices
Process – You will use this option to record a purchase that has been made on behalf of a tenant/owner. This is usually items that are used to repair the property.
Navigation – Property>Rental Units>Batch Creditor Non Stock Invoices
Function – Maintains a record of purchases made on behalf of tenant/owner.
Detailed – The following fields will be displayed on the screen for completion:
Supplier: You will select the supplier you are purchasing the items from.
Item Account: This is the account you are allocating the expense to.
Supplier Inv. No.: You will get this value from the supplier invoice.
Date: This is the date of the transaction.
Description: These are the details of the item purchased.
Unit Price(Incl.VAT): Cost of the purchased item.
VAT Code: This is the VAT Code for the purchased item.
Tenant/Investor: You will select the tenant/owner you are purchasing the item for.
Statement Description: These are the details that you want to appear on the tenant/owner’s statement.
Percentage to Charge: This is your mark up percentage on the purchase.
Type of Charge: You will select the type from the drop down menu.
You can add another purchase to the list by clicking Add Item. To save the purchase to a batch list click Process (transactions have not been processed).
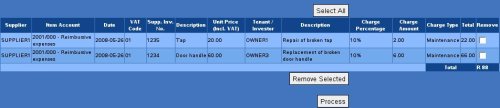
![]()
A list of the saved purchases will appear on the screen. To process the purchases click Process. You can remove purchases you do not want to process by clicking in the check box next to the purchase and then clicking on Remove Selected.
RENTAL DEPOSITS
1.Receiving a Rental Deposit
Process – This will enable you to process a transaction to show that you have received a deposit from a tenant.
Navigation – Property>Rental Units>Rental Deposits>Receive Deposits
Function – Keeps a record of all the deposits that have been received.
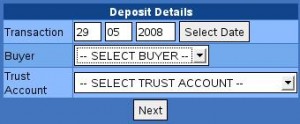
Detailed – Select the date on which you are receiving the deposit from the field labelled Transaction. Next select the Tenant you are receiving the deposit from. Select where the funds must be deposited to from the field labelled Funds Go To. The two options are a Trust account or a Current Account. Click Next.

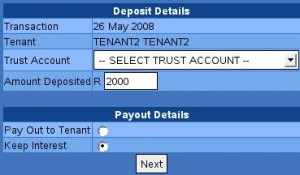
If have you selected to receive the funds into a Trust account a screen with the following details will be displayed:
Transaction: This is the date the transaction is processed on.
Tenant: This is the tenant you are receiving the deposit from.
Trust Account: You will select the Trust Account if it has been added to the system from this drop down menu.
Amount Deposited: This is the amount the tenant is paying as deposit.
Pay Out to Tenant: You will select this option if you want to pay out the interest received on the amount to the tenant.
Keep Interest: You will select this option if the company wants to keep the interest received.
On completion click Next.
The details of the deposit will be displayed on the screen. Check if all the details are correct and click Write. The next screen will display a message confirming the deposit. Next to the message is the option to Print a Receipt.
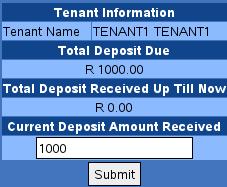
If you have selected to receive the funds into a Current Account a screen with the following details will be displayed:
Tenant Name: This is the tenant you are receiving the deposit from.
Total Deposit Due: This is the deposit the tenant is supposed to pay.
Total Deposit Received Up Till Now: If the tenant has paid part of the deposit it will reflect here.
Current Deposit Amount Received: This is the amount the tenant is paying at that time. After you have entered an amount click Submit.
The details of the deposit will be displayed on the screen. Check if all the details are correct and click Write. The next screen will display a message confirming the deposit. Next to the message is the option to Print a Receipt.
PROPERTY SALES
1. Adding a New Sale Property
Process – You will use this option to add a property for sale into the system.
Navigation – Property>Property Sales> Add New Sale Building/Property
Function – Maintain sale property details.
Detailed – A screen with the following fields to be completed will be displayed:
Suburb: This is the suburb where the property for sale is located.
Description: This is the street name of where the property for sale is located.
Date Listed:This is the date on which the property was put up for sale.
Address: This is the physical location of the property.
Property Type: You will select the most suitable option from the drop down menu.
Occupation: This is the date when somebody can move into the property.
The next section requires general details of the person/company that is selling the property.
The third section under Details will require you to enter the following information:
Erf No: This is the stand number.
Erf Size: This is the size of the stand in square metres.
Rates: You will get this value from the Municipality.
Price: This is the price the property is being sold for.
Commission VAT: Select whether the commission includes VAT or not.
Commission: This is the commission that you will receive when you sell the property.
Commission Type: This is the method used to calculate the commission. There are two options; Percentage whereby you calculate a specific percentage of the selling price as the commission or Amount whereby a monetary figure is used.
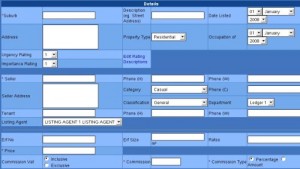
The next section headed Accommodation will require you to complete general details on the actual content of the property on sale. After you have completed the details click Next. The details of the property will be displayed on the screen. Check if all the details are correct and click Add Property.
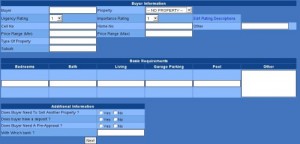
2. Adding a Buyer
Process – You will use this option to add a buyer to the system. Adding a buyer does not mean that you have to sell a property to them immediately.
Navigation – Property>Property Sales>Add New Buyer
Function – Maintains and record buyer details.
Detailed – You complete a form requiring the Buyer’s information. The following is a description for the non standard fields:
Property: This drop down field will consist of all the property on sale that has been added to the system. It is not compulsory for you to select a property to link to the buyer if the suitable one is not available.
Price Range (Min): This is the least value the buyer can afford.
Price Range (Min): This is the highest value the buyer can afford.
Type of Property: This is a description of the property the buyer is looking for.
Suburb: This is the area the buyer prefers the property to be physically located.
The next section will require information on the Basic Requirements of the buyer. In this case you will enter the number of rooms each field should consist of and if there is extra information to be entered it can be done in the field labelled Other.
The next section headed Additional Information requires information concerning the payment arrangements of the property from the buyers side.
On completion click Next. The details of the buyer will be displayed on the next window. Check if all the details are correct and click Next.
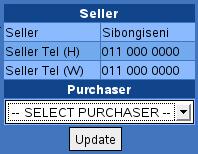
3. Selling Property to a Buyer
Process – You will use this option to sell an existing property in the system to a buyer that has also been added to the system.
Navigation – Property>Property Sales>Sell Property to Buyer
Function – Maintain a record of property sales.
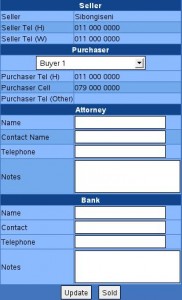
Detailed – Select the property you want to sell from the drop down field labelled Property to Sell. The next window will display the details of the property seller. Select the person/company that wants to buy the property from the drop down field labelled Select Purchaser and click Update.
The next window will display the details of both the seller and the buyer. You will be required to fill in the following sections:
Attorney: This is the Attorney you will be dealing with during the sale of the property. General details will be required under this field.
Bank: This is the bank the buyer will receive funds from. General details will be required under this field.
On completion click Update and then Sold.
The next window will display a message that gives you the option to receive the commission there and then or later. To receive the commission instantly click Receive Now.
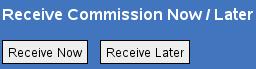
A window to receive the commission will display on the screen. Select the date you are receiving the commission on and fill in the amount you have received. Click Write.
The next window will have the following fields to complete:
Deal No: This is the number you will use to refer back to the property sale.
Percentage of Commission to Agency: This is the percentage of the total commission the Company will receive.
Agent: You will select the agent that sold the property.
Commission %: This is the percentage of the total commission the Agent will receive.
PAYE: This is the amount of PAYE to be deducted from the commission.
Please note that the percentage commission to the Agency and the percentage commission to the Agent should total 100%.
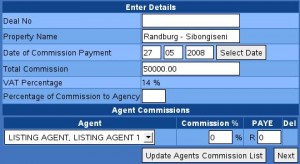
The next screen will display the details of how the commission has been allocated. Check if all the details are correct and click Next. This transaction is automatically recorded in the General Ledger.
If you have selected to Receive the commission Later the amount is shown on the Seller’s account as an outstanding balance (Debtors>View Customers).
4. Receiving a Deposit from a Property Buyer
Process – You will use this option to record a deposit that has been received from a property buyer.
Navigation – Property>Property Sales>Receive Deposit
Function – Keeps a record of all the deposits that have been received from a buyer.
Detailed – A screen with the following fields will be displayed:
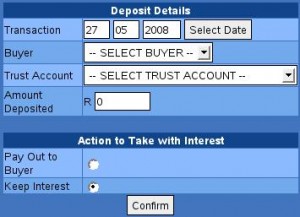
Transaction: This is the date you are receiving the deposit on.
Buyer: You will select the buyer you are receiving the deposit from.
Trust Account: You will select the account the deposit will be transferred to.
Amount Deposited: This is the amount you have received from the buyer as deposit.
Pay Out to Buyer: You will select this option if you want to pay out the interest received on the deposit to the Buyer.
Keep Interest: You will select this option if you want to keep the interest in the bank account.
After you have completed the form click Confirm.
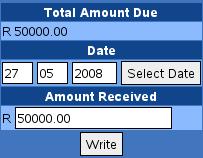
The next window will display the details of the deposit. Check that all the details are correct and click Write.
5. Paying Out a Deposit to a Buyer
Process – This will enable you to record that a deposit has been paid out to the property buyer.
Navigation – Property>Property Sales>Pay Out Deposit
Function – Maintain a record of deposits that have been paid out.
Detailed – Select the date on which you are receiving the deposit from the field labelled Transaction. Select the buyer you are paying out the deposit to from the drop down field labelled Buyer. Next select the account you are making the pay out from the drop down field labelled Trust Account. Click Next
On the next window you will select the deposit that is being paid out from the field labelled Select Deposit. Enter your estimate of how much bank charges you will be charged in the field labelled Estimated Bank Charges. Click Confirm.

The details of the deposit will be displayed on the next window. Check that all the details are correct and click Write.
6. Deposit Control Report
Process – You will use this report to view all the buyer deposits. This report will also show you whether or not a payment has been made out to the particular person/organisation.
Navigation – Property>Property Sales>Deposit Control Report.
Function – Maintains a record of buyer deposits.
Detailed – The Buyer deposits and payouts that have been processed in the Trust account will be displayed in the first section headed Buyer Deposit Report.
![]()
The next section headed Trust Account Totals Report will display the total amount for the Deposits received into the Account from both Buyers and Tenants.
The last section headed Buyer Deposit Receipts/Confirmations will display the buyer deposits with the following options next to each:
Receipt: This will print a receipt confirming a deposit was received.
Pay Out Confirmation: This will allow you to record that a deposit has been paid out to the buyer. Once the deposit has been paid out this option will be removed from the field.
![]()
REPORTS
1. Report on Buildings/Complexes
Process – A report with details on complexes that have added to the system will be displayed.
Navigation – Property> Rental Units>Report on Buildings/Complexes
Function – Maintains a record of the activity of the individual units within the complex.
Detailed – On the first window select the property you want to view the report on from the field labelled Select Property. Select the options you want the report to display by clicking in the check box next to the options in the field headed Reports to View. Click View Reports.

The following is a description of the options that will display on the report if selected:
Units that have not Processed Payments: This option will display all the units that have not been billed for rent.
Units that have Processed Payments: This option will display all the units where a payment has been received. The total amount received per unit will be displayed in the field labelled Total Amount Received.
![]()
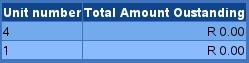
Units that have Outstanding Balances: This option will display all the units that have been billed for rent but have not been fully paid. The amount owed on the unit will be displayed in the field labelled Total Amount Outstanding.
![]()
Unoccupied Units: This option will display the details of units that are vacant. The report will display the property’s unit number, the size of the property in the field labelled Total Area, a brief description of the property, Outstanding Tasks and the rental amount in the field labelled Price.
![]()
Occupied units: This option will display the details of the units with tenants. The report will display the property’s unit number, the size of the property in the field labelled Total Area, a brief description of the property, Outstanding Tasks, the rental amount in the field labelled Price, the Tenant’s name and the contact numbers for the Tenant.
![]()
2. Rentroll
Process – This report will display the rentals that are billed to the tenant and the total amount that is due from the client.
Navigation – Property >Rental Units>Rentroll
Function – Maintains a record of billed rentals.
– Maintains a record of outstanding payments.
Detailed – The report will display the following fields:
Tenant: This is the tenant that is occupying the property.
Unit: This is the name you use to refer to the property.
Owner: This is the owner of the property.
Charged:This is the total rental bill the tenant was charged.
Outstanding: This is the amount the tenant is owing.
Notice Extension: This is the Lease expiry date.
Increase: This is the date on which the rentals will be increased.
Print: Will enable you to print the report.
Snapshot: Will enable you to save the report into the system.
![]()
You can view a saved Rentroll by clicking Property>Rental Units>View Rentroll Archive. Select the period you want to view the saved Rentroll for and click Search. The date on which the rentroll was saved will display on the screen with the options:
Print: Will print the saved Rentroll.
Delete: Will remove the saved Rentroll from the system.
3. All Rentals/Complexes
Process – This report will display information on all the property that has been added to the system.
Navigation – Property>Reports>View All Rentals/Complexes
Function – Maintains a record of general information for a property.
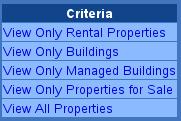
Detailed – The report will display all the properties you have added into the system in sections. You can select the property you want to view the report on from the field labelled Criteria.
The following is a description of the fields that will be display on the report for each section:
Rental Property
Building Name: This is the name you use to refer to the property.
Unit/Stand/Erf Number: This is the number used to refer to the property.
Tenant: This is the tenant occupying the property.
Address: This is the physical location of the property.
Building Details: This is a brief description of the property.
Owner: This is the owner of the property.
Price: This is the monthly rental charge.
Next to each property are the following options;
Print: A printable form with the property details will be displayed.
Edit Misc Information: Allows you to edit miscellaneous information only.
Edit: Allows you to change the details of the property.
Move to old rentals: You will use this option when the you are no longer renting out the property. This option allows for the property to be archived.
Inventory: You will record any tangible items that can be removed from the property so that you have a record of the items in the property when the tenant moves in an out.
![]()
Building/Complex
Unit Number: This is the number used to refer to the property unit.
Tenant: This is the tenant occupying the property.
Notes: Brief description of the property.
Available from: This is the date from which a tenant can move into the property.
Outstanding Tasks: These are any jobs that need to be completed on the property.
Total Square Meters: This is the size of the property.
Price: This is the monthly rental charged for the property.

Property for Sale
Seller: This is the person/company that is selling the property.
Title: This is the type of the property on sale.
Address: This is the physical address of the property on sale.
Listing Agent: This is the agent/employee handling the sale of the property.
Price: This is the selling price of the property.
Status: This is the status of the property.
![]()
OFFICE DOCUMENTS
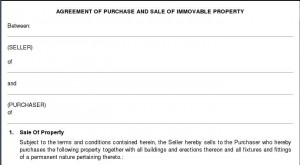
1. Producing Office Documents
Process – This function allows you to generate documents that are used for leases and sale of property.
Navigation – Property>Office Documents>Produce Office Document
Function – Generates documents that are used by Estate Agents.
Detailed – Select the document you want to generate from the drop down field labelled Select Office Form. To generate the form click View.
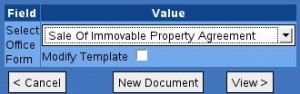
The selected form will display on the screen as a template. You are able to edit the form to suit your requirements. When you have completed the changes click Update.
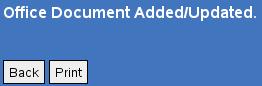
The next window will display that the document has been updated. Below the notice is two options; Back which will take you back to view the document and Print which will display the document on a printable form.
You can add a document into the system by clicking the New Document option on the first window that appears when you select to generate a document. The next window will require you to enter the Document Type and the Document Name. There are two options on the screen; Reset which will automatically erase the text you have entered in the Document Type and Document Name fields and Create which will allow you to create the document.
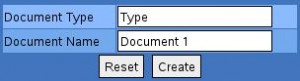
When you click on Create you will be taken to the the window that appears when you select to generate a document with the Document Name already selected. Click View. A window with a blank section for you to enter the details of the document will be displayed. After you have completed the document click Update. This will save the document into the system.
You can also print forms that can be used to obtain client and property details so that they can be captured into the system. You do this by clicking Property>Office Documents> Select from the available options:
New Buyer: You will use this option to print out a form that will be completed by a client that wants to purchase a property.
New Sales Property: You will use this option to print out a form that will be completed by a client that wants to sell a property.
New Rental Property: You will use this option to print out a form that will be completed by a client that wants his property to be rented out.
New Building/Complex: You will use this option to print out a form that will be completed by a client that wants the building/complex that he owns to be rented out.
New Building/Complex (Units): You will use this option to print out a form that will be attached to the form that has been completed for a New Building/Complex. This form allows you to make print outs for the individual units.
COMMISSION
1.Agents Commission on a Property Sale
Process – You will use this option on a property that was sold but the commission was not received at the time of the sale.
Navigation – Property >Agents>Finder’s Fee and Other Commission
Function – Saves a record of commission received by the Agent and the Agency.
Detailed – A form with the following fields will be displayed:
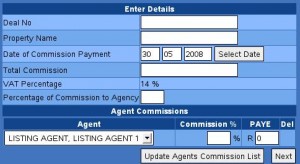
Deal No.: This is the number you use to refer to the sale.
Property Name: This is the name of the property that has been sold.
Date of Commission Payment: This is the date on which the Commission was paid.
Total Commission: This is the total commission received from the property sale.
Percentage of Commission to Agency: This is the percentage of the total commission the company will receive.
Agent: Select the agent that is responsible for the sale.
Commission %: This is the percentage of the total commission the agent will receive.
PAYE: This is the amount of PAYE to be deducted from the commission.
Please note that the percentage commission to the Agency and the percentage commission to the Agent should total 100%.
Click Next.
The next screen will display the details of how the commission has been allocated. Check if all the details are correct and click Next. This transaction is automatically recorded in the General Ledger.
2. List Commission
Process – This will enable you to view the commission that has been allocated to the both the Agent and the Agency.
Navigation – Property> Agents> List Commission
Function – Maintains a record of the commission that has been paid on the sale of a property.
Detailed – The following fields will be displayed:
Deal #: This is the number used to refer to the property sale.
Property Name: This is the name of the sold property.
Total Commission: This is the total amount paid for commission.
Commission to Agency Percentage: This is the percentage of the total commission that has been received by the Agency/Company.
Agency Commission Amount: This is the amount of commission received by the Agency.
Commission Payment: This is the date on which the commission was received.
Agent: This is the name of the agent responsible for the sale.
Agent Commission Percentage: This is the percentage of the total commission that has been received by the Agent.
PAYE: This is the PAYE amount deducted from the commission amount received by the agent.
Agent Commission Amount: This is the amount of commission received by the Agent.
Move to Previous Agent Commission: This will archive the commission so that it does not appear on the list each time you view commission.
![]()
3. List Previous Agent’s Commission
Process – This will enable you to view archived commissions.
Navigation – Property> Agents>List Previous Agent’s Commission
Function – Maintains a record of archived commission.
Detailed – Select the period for which you want to view the archived commission for from the field labelled Select Period and click Search.
For more information or to arrange a demonstration on Cubit please email us on
Please send me more information on Cubit please