You can Create and Online Invoice or generate quotes and create online Invoices from these online quotes from only R69 per month. For complete online Invoicing please email us on for online Invoicing
Creating an Invoice is a very important function of business and in Cubit there are over 50 different Invoices. You can create a non stock invoice, stock invoice, recurring invoice, combination invoice, run invoice, multi line invoice and many many more.
1. Creating a Stock Invoice
Process – When you process an invoice your Customer and Stock balance is updated.
Navigation – Sales > Invoices > New Invoice
Function – Keep a record of all invoiced items.
– Updates debtor balances.
– Updates sales figures.
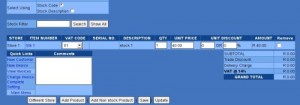
Detailed – To create a new invoice:
On the main invoice page you will have 2 fields to fill in; the department and the first letters of the customer then click update.

You can select a customer from the drop down list at the top left of the page. After doing this all
the customer fields will be filled automatically. The Customer order number is optional but is
useful when searching for a customer order. The customer supplies this value from their books.
To add a product you will first select an option of how you want to select the product/stock
item. There are 2 options by Stock Code or by Stock Description.
You will type in the first letters of the stock item you want to invoice and click Search or you
can click Show All which will give you a list of all your stock items from which you will select
the stock item you want to invoice. The product list only contains stock items of the specified
store. You can change the store by clicking ‘Different Store’.
Enter the quantity of items being ordered in the quantity box.
There are 2 discount fields on this page, the first one for specifying a discount in currency
format and the second for percentage discount.
You can add another product by clicking on Add Product. You can also add a product that is not
on your stock list by clicking on Add Non Stock Product.
A selected product can be removed by clicking in the Remove check box to the right of the
product. Clicking Update will remove the product from the list.
At the bottom left of the screen is a Comments box. You can add a text that you need displayed
on the invoice here.
If you wish to continue the invoice only in the future, click the Save button. You can then go on
to doing something else. The system saves the invoice as an incomplete invoice.
If you wish to process the invoice click Update and then Process. The invoice will appear on your screen ready to be printed.
2. Viewing an Invoice
Process – This menu is used when you want to view invoices that have already been processed.
Navigation – Sales > Invoices > View Invoice
Function – Record of all invoices.
Detailed – On the first page you are given the option to enter a date for invoices you wish to view. You could use the default values ( which is from the first of the current month up to today’s date) or you can enter the specific date you want to view the invoices for. A further field of input is made available where you can select to view invoices for a specific customer or view all. After selecting the criteria for the invoices you wish to view click Search.
A list of the invoices you have selected will be listed. Totals and balances are also displayed.
![]()
The following options are displayed next to each invoice:
Details: shows you the complete processed invoice.
Credit Note: allows you to credit note the selected invoice. When an invoice is credit noted the
both the Customer and Stock balances are automatically updated.
Reprint: prints the invoice again but a text indicating that the invoice is a reprint is displayed.
Reprint in PDF: prints the invoice in PDF format.
Delivery Note: this option allows you to generate a printable delivery note.
3. Viewing a Paid Invoice
Process – when an invoice is paid for in full it is moved from the View Invoice menu to the View Paid Invoice menu.
Navigation – Sales > Invoices > View Paid Invoices
Function – Keeps a record of all your paid invoices.
Detailed – On the first page you are given the option to enter a date for invoices you wish to view. You could use the default values ( which is from the first of the current month up to today’s date) or you can enter the specific date you want to view the invoices for. A further field of input is made available where you can select to view invoices for a specific customer or view all. After selecting the criteria for the invoices you wish to view click Search.
A list of the invoices you have selected will be listed. Total payments are also displayed.
![]()
The following options are displayed next to each paid invoice:
Details: shows you the complete processed invoice.
Credit Note: allows you to credit note the selected invoice. When an invoice is credit noted the
both the Customer and Stock balances are automatically updated.
Reprint: prints the invoice again but a text indicating that the invoice is a reprint is displayed.
Reprint in PDF: prints the invoice in PDF format.
Delivery Note: this option allows you to generate a printable delivery note.
4. Incomplete Invoices
Process – All invoices that have not been processed are saved in the system under the View Incomplete Invoice menu.
Navigation – Sales > Invoices > View Incomplete Invoices
Function – Keeps a record of all invoices that have not been processed.
Detailed – On the first page you are given the option to enter a date for invoices you wish to view. You could use the default values( which is from the first of the current month up to today’s date) and click Search. A of all the invoices that have not been processed will be displayed.
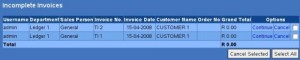
The following options are displayed next to each incomplete invoice:
Continue: this will enable you to complete the invoice.
Cancel: this removes the invoice from the list and takes it to the View Canceled Invoices menu.
5. Edit Invoice Prices
Process – This enables you to change the price of all your invoiced items. Note that it is only the price on an invoice that has not been processed that can be changed.
Navigation – Sales > Invoices > Edit Invoice Prices
Function – Changing the price of an item without having to go into the incomplete invoice.
Detailed – On the first page a list of all your incomplete invoices with prices will be displayed.
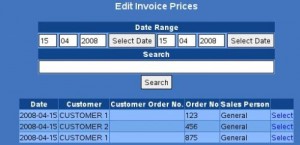
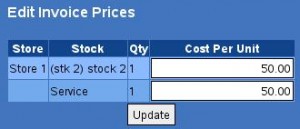
Select the Incomplete invoice you want to edit a price for by clicking Select. A list of items and
their prices will be displayed. From here you will be able to change the price displayed next to
item. When you are done you can click Update.
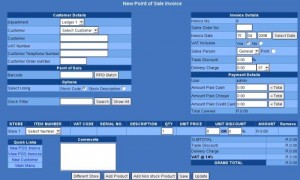
6. Creating Point of Sale Invoice
Process – A Point of Sale Invoice is an invoice that is made out to clients that are not on your customer list. This is useful for companies only dealing in cash sales.
Navigation – Sales > Invoices > New POS Invoice
Function – Processing of cash sales.
Details – To create a new Point of Sale Invoice:
Fill in the Customer’s name and order number. These fields can be left blank for a cash sale. An order number is an optional value which is useful for referring back to this invoice in the future. The customer supplies this value from his books. You can also enter the barcode if necessary. You will add a product to the invoice the same process used when creating a new invoice. After adding the product you will be required to fill in the amount paid. The options available are Cash, Cheque and Credit Card. If you are invoicing a Customer from your customer list an additional field; Amount on Credit will appear.
When you have filled in the amount you can click Update and then Process to complete the invoice. A printable slip will display on your screen ready to be printed.
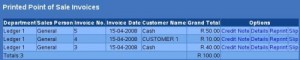
8. Processed POS Invoices
Process – A list of all your processed invoices is saved under this menu.
Navigation – Sales > Invoices >View Processed POS Invoices
Function – Record of all processed POS invoices.
Detailed – On the first page you are given an option to enter a date for the invoices you wish to view and click Search. A list of all processed invoices will be displayed. Next to each invoice are the following options:
Credit Note: allows you to credit note the selected invoice. When a credit note is passed both the Cash on Hand and Stock balances are updated automatically.
Details: displays the information on the invoice.
Reprint: displays a printable invoice but a text indicating that the invoice is a reprint is displayed.
Slip: displays a till slip in printable format.
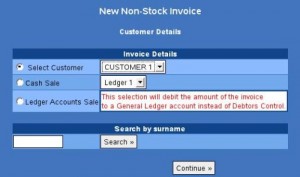
9. Creating a Non Stock Invoices
Process – Non Stock Invoices are used when you want to sell items that are not included in your stock list. An example is when you are selling old equipment to buy new equipment.
Navigation – Sales > Invoices > New Non Stock Invoice
Function – Keep a record of every non stock item invoiced.
– Update debtor balances.
– Update sales figures if the items invoiced contribute to turnover.
Detailed – On the first page you will be required to select the customer you want to invoice and
click Continue.
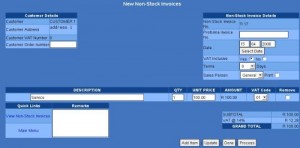
On the next page you will fill in the description of an item, the quantity of units and the price per unit and click Update. If you wish to add another non stock item click Add Item.
To remove a product click in the remove check box to the right of the product and click Update.
After you have added all the items to the invoice click Process.
On the next page you will select the ledger account you wish to credit with this sale. After
selecting the account click Confirm and then Write. An invoice in printable format will display
on your screen ready to be printed.
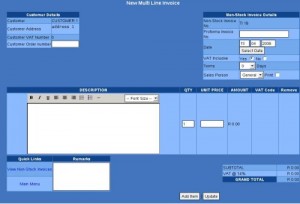
10. Multi Line Invoice
Process – This invoice works in exactly the same way as the Non Stock Invoice. The only difference is that with the Multi Line Invoice you can invoice an item with a long description attached to it.
Navigation – Sales > Invoices > New Multi Line Invoice
Function – Keep a record of all Multi Line Invoices.
– Update debtor balances
– Update sales figures if item being invoiced contributes to the turnover.
Detailed – All the steps to be taken are exactly the same as when creating a non – stock invoice.
The only difference is the amount of space provided on the Multi Line Invoice.
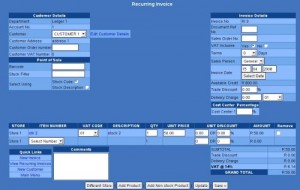
11. Recurring Invoices
Process – The system allows you to enter the details of the invoice once but you will be able to process the invoice as it is required.
Navigation – Sales > Recurring Invoice > New Recurring Invoice
Function – Stores a once of invoice that is used to bill the customer each time the need arises.
– Bulk invoicing
Detailed – You will create the Recurring Invoice in exactly the same way as you create a
a New Invoice. The only difference is that with a recurring invoice you do not process the
invoice but you Save it. The invoice will be saved under the View Recurring Invoices menu.
12. Processing an Invoice from a Recurring Invoice
Process – You will be able to process the saved invoice from the View Recurring Invoice menu.
Navigation – Sales > Recurring Invoices > View Recurring Invoice
Function – Bulk invoicing.
Detailed – On the first page you are given the option to enter a date for invoices you wish to view. You could use the default values ( which is from the first of the current month up to today’s date) or you can enter the specific date you want to view the invoices for. A further field of input is made available where you can select to view invoices for a specific customer or view all. After selecting the criteria for the invoices you wish to view click Search.
A list of all your saved recurring invoices will be displayed with the following options next to each invoice:
Detail: will display the information on the invoice.
Edit: enables you to change the information in the invoice.
Invoice: you will be able to process the invoice for the customer.
Remove: deletes the saved invoice from the system.

13. Recurring Non Stock Invoice
Process – You will use this to create a recurring invoice for a non stock item for example a Service you bill a client for on a monthly basis.
Navigation – Sales > Recurring Invoice > New Recurring Non Stock Invoice.
Function – Stores a once of invoice that is used to bill the customer each time the need arises.
Detailed – You will create a recurring non stock invoice in exactly the same way as you would create a non stock invoice. The only difference is that with a recurring non stock invoice you do not process the invoice but you Save it. The invoice will be saved under the View Recurring Non Stock Invoices menu.

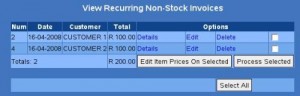
14. Processing an invoice from a Recurring Non Stock Invoice
Process – You will be able to process the saved non stock invoice from the View Recurring Non Stock Invoices menu.
Navigation – Sales > Recurring Invoices > View Recurring Non Stock Invoice
Function – Bulk invoicing
Detailed – On the first page you are given the option to enter a date for invoices you wish to view. You could use the default values ( which is from the first of the current month up to today’s date) or you can enter the specific date you want to view the invoices for and click Search.
A list of all your saved recurring invoices will be displayed with the following options next to each invoice:
Details: will display the information on the invoice.
Edit: enables you to change the information in the invoice.
Remove: deletes the saved invoice from the system.
15. SALES REPORTS
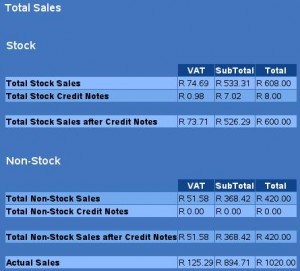
Total Sales
Process – This report will display all your sales.
Navigation – Sales > Reports > Total Sales Report
Function – Maintains your turnover.
Detailed – On the first page select the date range you wish to view and click View. The report will display the following:
Total Stock Sales after Credit Notes have been subtracted.
Total Non Stock Sales after Credit Notes have been subtracted.
Total Actual Sales which is your Stock Sales and Non Stock Sales added together.
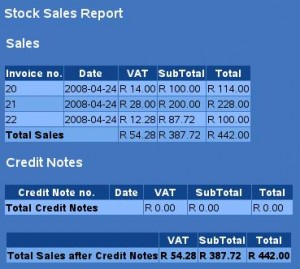
Stock Sales Report (VAT)
Process – This report will display all your stock sales individually.
Navigation – Sales > Reports > Stock Sales Report (Vat)
Function – Maintains a record of all your stock sales.
Detailed – On the first page select the date range you wish to view and click View. A report will
display all your stock sales for the selected period.
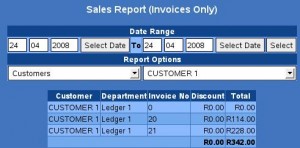
Sales Report ( Invoices Only)
Process – This report will display discount given to customers and invoice totals only.
Navigation – Sales > Reports > Sales Report ( Invoices Only)
Function – Maintains a record of all discount given out to customers on a specific invoice.
Detailed – On the first page select the date range you wish to view the report for. Next select
an option under Report Options drop down menu of how you would like to view the report.
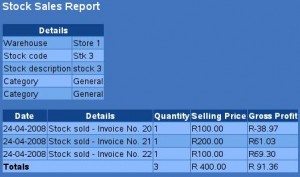
Period Range Stock Sales Report
Process – This report will display the sales and gross profit per stock item.
Navigation – Sales > Reports > Period Range Stock Sales Report
Function – Maintains a record of the gross profit made on each invoiced stock item.
Detailed – On the first page select the Store , Category and Classification of the stock item you
want to generate the report on. If you wish to generate a report on all the stock items click on
View All. Next select the stock item you wish to view or click on All to generate a report for
all your stock items. Select the date range you wish to view the report for and click Continue.
Invoice Discounts Report
Process – This report will show you a list of all the discounts that have been given to customers.
Navigation – Sales > Reports > Invoice Discounts Report
Function – Maintains a record of all discounts given to customers.
Detailed – Select the department from the drop down list and type in the first letters of the
customer. The ‘First Letters of Customer’ field is optional and can be left blank to make a listing
of all the customers. Click Continue.

A list of the discounts given to each of the customers you have selected will be displayed.
For more information or to arrange a demonstration on Cubit please email us on
Please send me more information on Cubit please