Inventory and Stock inventory systems:
Cubit Accounting and Payroll has a very advanced stock and inventory system, in the basic software one can assemble and disassemble stock and inventory items, the system even has RFID, warranty and serial tracking, a complete workshop with call out management and much more.
We gaurantee you the most comprehensive Business, Accounting and Payroll software ever, for more information or to arrange a demonstration on Cubit please email us on Please send me more information on Cubit Business Software please
1. Adding a Stock Item
Process – Before you can create a stock invoice or stock order you need to add stock to your system. By adding a stock item on your system you are recording the fact that there is such a stock item and not adding the quantity of that stock.
Navigation – Stock > Add Stock
Functions – Create a stock master file
– Maintains stock item settings and other data related to that stock item
– POS (Cash Sale) and Default Sales price is set in the same master file
Detailed – Complete the add stock screen and click Confirm. Check if all details are correct and click Write.

The following is a description of the different fields you need to complete to add a stock item:
Stock code: Identification of the stock item. This code can contain both numbers and letters.
Stock description: Description of the stock item. Useful when the ‘Stock Code’ is in unreadable form, and you want the invoice to be understood by the customer.
Type: What type of the stock item is.
Category: The category to which you wish to add the stock item to.
Upload Stock Image: If yes is selected, you will be able add image of the stock item.
Buying Unit of Measure: When you purchase a stock item you purchase it in Units, this is the measurement of units, eg per 5 meters, so you would enter a 5 in this field.
Selling Units Per Buying Unit: If you bought the stock item in 1 unit, but sell it in separate units, you will need specify how many units of the selling units you have for each buying unit. eg you buy bread per dozen but you sell them separately so you have 12 selling units per buying unit.
Location: This simplifies finding the stock item in the store.
Level: This is the minimum/maximum amount of items you may have in your stock. When your stock reaches this limit you will receive a notification. This will not prevent you from continuing with what you are doing. It is just a reminder that your stock limit has been reached.
Selling price per unit: The price you are selling your stock item for.
Bar Code: If you use a bar coded system you can enter the bar code for the stock item in this field.
Vat Code: Select the Vat Code for the stock item from this field.
Mark Up Percentage: This is the percentage markup from cost that you set your selling price at. For example an item with a cost price of R10 is sold at a mark up of 10%. Therefore the selling price is R11.
Supplier: Select the supplier you prefer to purchase this item from.
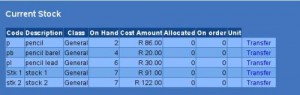
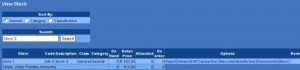
2. View Stock
Process – By Viewing Stock a list of all the stock items you currently have in your store will be displayed.
Navigation – Stock > View Stock
Functions – Summarise stock item details
– Displays quantity of available stock on hand
– Displays selling price of stock item
– Displays quantity of stock item that has been allocated
– Displays quantity of stock item that is on order
Detailed – When you View Stock there are options displayed next to each stock item.
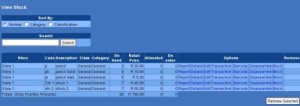
The following is a description of all the options:
Report: Gives you more information on the stock item. It is important to note that only the selling price of the stock item is displayed in this report and not the cost price. The stock allocations can also be viewed here.
Details: Shows the details you entered when you created the stock item. Both the selling price and cost price of the stock item will be displayed. If an image has been added to the stock item it will be displayed on this screen.
Edit: This allows you to change the details of the stock item.
Transaction: This is used when you want to make changes to your stock quantity due to an error made on your sales/purchases and you need to correct this or when you need to decrease stock due to theft, damage.(You need to add an expense account for stock loss, before decreasing stock due to a loss)
Bar Code: Instead of a stock item type having a bar code, you can give each separate item its own bar code in this option.
Block: This will prevent you from performing any transactions (purchases and sales included) on the selected stock item until it is unblocked.
Remove: Deletes stock item from the stock list. Only stock items with no transactions on them can be removed.
2. Stock Take
Process – This will enable you to compare your physical stock quantities with the stock quantities in the system.
Navigation – Stock > Stock Take
Functions – Enables you to check if purchase orders are received correctly into the store.
– Enables you to check if stock is managed efficiently.
Detailed – Steps taken during stock take are:
Pre Stock Take: a list of all your stock items is printed with empty quantities so that you can input the quantities that have been counted
Post Stock Take: allows you to input the quantities resulting from the stock count
Stock Take Adjust: stock items with quantities that do not correspond are displayed with the option to adjust each quantity so that it corresponds with physical quantity.
3. Stock Transfer
Process – Stock transfer is used to transfer stock between different stores.
Navigation – Stock > Stock Transfer (Store)
Function – Helps to maintain accurate quantities for a stock item.
– Efficient recording of stock movement.
Detailed – To transfer a stock item first select the stock item you wish to transfer. Next to the stock item is the option to transfer. (You can not transfer negative stock.)
4. STOCK REPORTS
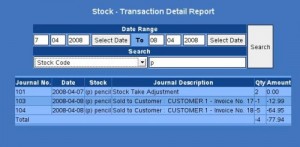
Stock-Transaction Detail Report
Process – This report will enable you to view all the transactions that have been carried out on
the selected stock item over a selected period of time.
Navigation – Stock > Reports > Stock-Transaction Detail Report
Function – Record of all transactions carried out on a stock item.
Detailed – These are the steps to follow when you want to view the report:
Select the date range for which you wish to view the transactions.
Select search criteria. The options available are Stock code, Stock description, Journal number
and Journal description.
Fill in the field next to the Search criteria option selected and click search.
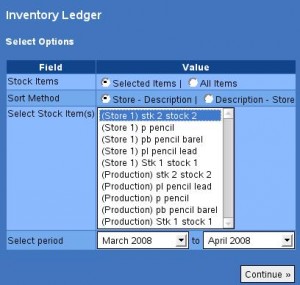
Inventory Ledger
Process – This report enables you to view stock transactions over a monthly period of time
Navigation – Stock > Reports > Inventory Ledger
Function – Keeps track of stock item’s quantity on hand.
– Keeps track of total cost (balance) for the stock item.
Detailed – To view your inventory ledger:
Select if you want to view only selected stock items or all stock items.
Highlight the stock items you want to view if you have selected the option to view only selected items.
Select the period for which you wish to view and click continue.
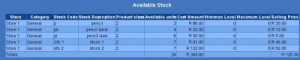
Available Stock
Process – This report will show you a list of the available stock items
Navigation – Stock > Reports > Available Stock
Function – Keeps a record of quantities for available stock items.
Detailed – Displayed on the report are the following details:
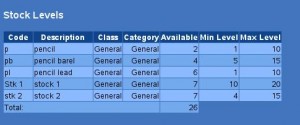
Stock Levels
Process – This report will show you the Minimum and Maximum stock levels for the stock items selected.
Navigation – Stock > Reports > Stock Levels
Function – Keeps a record of Minimum and Maximum stock levels.
Detailed – The report displays Available Stock, Minimum level and Maximum level.
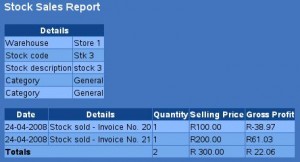
Stock Sales Report
Process – This report will show you the stock items you have invoiced and the gross profit made on the stock items.
Navigation – Stock > Reports > Stock Sales Report
Function – Keeps a record of the Gross Profit on Stock Sales.
Detailed – On the first page select how you wish to view the report. You can either select from
Classification or Category. To view all the stock click on View All. On the next page select the stock item you wish to view from the list of stock items that are displayed. Select the date range and click Continue.
The report will display the following:
Details: This displays basic information of the stock item.
Date: This date is the date on which the stock item is invoiced on.
Details: Displays the invoice number.
Quantity: Displays the number of items invoiced.
Selling Price: The price the stock item was sold for.
Gross Profit: Gross profit made from the sale of a stock item.
5. Basic Manufacturing
Process – You can use this option if you manufacture your own stock.
Navigation – Stock > Manufacturing Recipes
Function – Maintains recipes created to manufacture finished products.
Detailed – On the first page you will select the stock item you want to create a recipe for. Next you will select the stock you will use to manufacture the stock item with and click Add. To remove a stock item click in the check box under the Add Remove field. When you have added all your stock items click on Save.
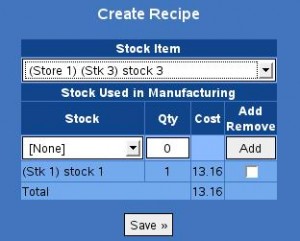
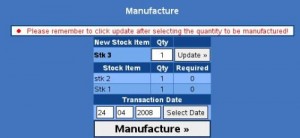
Creating a recipe enables you to manufacture your own stock. To manufacture the stock item go to View Stock and select the stock item you have created a recipe for. Next to the stock item you see an option Manufacture.
Click on Manufacture. The recipe for the selected stock item will be displayed on the screen. Select the number of stock items you want to manufacture and click Update. Select the date of transaction and click Manufacture.